
SNOW .....
I just LOVE snow! It's so beautiful when it blankets everything in crisp clean white. It is calming and exciting at the same time. I'm just like one of my boys when it comes to snow -- I get just as excited if not more so then they do.
With these colder temperatures lately I'm itching for the fluffy white to come down our way.
I'm teaching a Scrapbooking Class this evening in my home. The theme of course is SNOW! It coincides with the Close To My Heart stamp of the month this month. It is called All Decked Out -- it is a set of snowman pieces so you can build your own snowman on paper.
Snowmen are at the top of my list for winter decor so I couldn't resist using this stamp set on tonight's projects. I will be teaching a few techniques to add to the layouts.....liquid glass with prisma glitter, paper piecing with our stamped images, using liquid applique for snow and how to add more photos to a page without creating more full page layouts.[Photo][Photo]
I used the ASPEN Level 2 Paper Packet for my layouts. (X7103B). Layouts are from IMAGINE (9030) Ensemble Piece on pages 40-41.
LIQUID GLASS
I love this stuff! It adds a glossy affect to your photos or stamped images. For this layout I added Liquid Glass (Z679) to the band on the snowman's hat. While it was wet I sprinkled in some Prisma Glitter (Z134) for a shimmering affect. It is in a small spot so it is hard to tell in the photo.
Liquid Glass is fun to also useas water, ice, or dew drops on a flower. I did an Easter Egg Hunt layout with black and white photos. I chalked color onto the plastic eggs and put liquid glass on top to give them dimension. It can also be used as an adhesive. It is very strong and will hold on your ribbons, buttons, etc but it does take a little longer to dry.
[Photo]
PAPER PIECING with STAMPED IMAGES
This is an easy technique that looks complicated. It does take a minute more then just stamping your images because it involves cutting.
For the snowman --
1- I first stamped his head and face onto Textured White Cardstock (X5671).
2- Then I stamped his hat right on top of his head overlapping.
3- I stamped his hat again onto a scrap of patterned paper.
4- I stamped his hat one last time onto a different patterned paper.
5- Then I stamped his scarf, also over lapping his head.
6- I stamped his scarf again onto a scrap of patterned paper.
7- Cut out the white snowman hat, face and scarf -- being sure to leave them all connected.
8- Cut out the patterned hat, scarf and the band from the 2nd stamped patterned hat.
9- Adhere the hat band to the hat.
10- Adhere the patterned hat to the white one -- puzzle work at this time as you layer the pieces together.
11- Adhere the scarf to the white one.
There you have a Paper Pieced Snowman.
I colored his nose with an orange colored pencil (Z921) and added SPARKLES (Z1104) to his scarf.
TITLE
I stamped the title with Friendship Large Alphabet (Exclusive for hostesses) with Outdoor Denim Ink (Z2140) onto the White Textured Cardstock (X5671). I cut out the letters leaving a white border around them. I used Liquid Applique (Z308) on the letter tops to resemble snow piles on the letters.
ACCENTS
I also added some stamped trees from the STEEP AND DEEP (D1175) stamp set in Ponderosa Pine Ink (Z2145), also with a little Liquid Applique (Z308) on them.
Snow Cocoa was stamped using the Friendship Small Alphabet (Exclusive for hostesses).
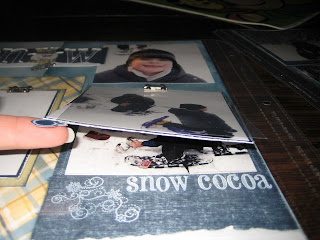
HOW TO ADD MORE PHOTOS
I created little "lift the flap" spots on my pages. I had more photos I wanted to include but were not necessarily my focal points. Some were similar to what I had displayed already. I used Hinges (Z291) to enable them to lift mor easily. If you are not a hardware user, you can make a paper "hinge" by folding cardstock and adhering it under the photos. I added a little mitten as the lift spot. In order for this to work, you also need to cut slits in your page protector. I used a straight edge and a Cutting Knife (Z533). Be sure to punch circles where the corners meet. They help keep the page protector from tearing more. You can use your eyelet setter and hammer with the self healing mat behind the page protector so you don't cut all the way through.

No comments:
Post a Comment